
No dogs allowed
Dogs are considered as not clean animals according to Islamic law in Maldives and it is prohibited in Maldives . The only dog is the police dog which is used to detect drugs.

polis
üç dost gecə saatlarında içkili vəziyyətdə şəhərdə gəzişirik.
Qarşıdan da aşa aşa iki polis işçisi gəlir..
- birimiz : ala bunlar da piyandır ki :)
- polis : bə bizi ana doğmuyuub !!!
Qarşıdan da aşa aşa iki polis işçisi gəlir..
- birimiz : ala bunlar da piyandır ki :)
- polis : bə bizi ana doğmuyuub !!!

olmuş hadisə
(4 dost getmişik şəhərdəki şaurma-ya)
1- qaqaş burda wi-fi var?
2(Ofisiant)- çörəkdə var, birdə lavaşda. hansından istəyirsiz?
1- yox ee wi-fi, simsiz internet.. wirelesss
2- o nedi ???
1- heçnə heçnə ... sən get 4 dənə şaurma gətir
1- qaqaş burda wi-fi var?
2(Ofisiant)- çörəkdə var, birdə lavaşda. hansından istəyirsiz?
1- yox ee wi-fi, simsiz internet.. wirelesss
2- o nedi ???
1- heçnə heçnə ... sən get 4 dənə şaurma gətir
Talışlar vs. 300 Spartalı (true story)
baxmısız da 300 spartalıya . Leonidos birdə 300 spartalı kral Kserksin saysız ordularıynan vuruşur.
bugün Hirkan Milli parkı haqqında maraqlı şey* oxumuşam
" Bölgənin əsas əhalisi talışların əcdadları sayılan kaspi və kadusi tayfaları təşkil edirdi. Onlar əsasən öz cəngavərlikləri ilə seçilirlər. Herodot yazır ki: Kaspilər Əhəməni padşahı Kserksin Helladaya(indiki Yunananıstandı Hellada) yürüşündə iştirak edirmiş. Kaspilərin Makedoniyalı İskəndərin qoşunlarına qarşı vuruşduqları da məlumdur. Döyüşçü Kaspilər yapınc geyirdilər qamışdan hazırlanmış və yerli ox və kamanlarla silahlanırdılar "
maraqlı dı ee bizimkilərdə 300 spartalıya qarşı vuruşublar. bilməy olomaz - *Ölümsüzlər var ee kinodaa, bizimkilər imiş bəlkə. Ölümsüz lər də qara idi, bizim talışların da çoxu qaradı:)
maşAlla hamısı kəndavoy kişilərdi :p
X.o x.o Mahmud Grandpa
QIJI QIZLA - QIJI OĞLANIN BÜTÜN SÖHBƏTLƏRİ (52 dənə GİZLİ zapis )
çox gizli - şəxsi kolleksiya -
Burda həmin söhbətlərin bəzilərinin adları var
AĞLAMAQ
AXIRINCI AĞLAMAQ
AYAĞININ ALTINDA ÖLÜM
BAŞDAN XARAB
DƏLİ
GİCLİYİ TUTMASI
QOLLARINI KƏSİR
QUŞ RÖYA
MAHNI
SON SÖZ
SUPER
ZƏNGİMCELL
AXIRINCI
Запись
və daha 10 larla zapis
Yüklə - скачать - Download
əməyə hörmətlə yanaşaq - leave comments dear Baba's followers :)
Mahmud Baba Bütün Prikolları (Tərkibində Söyüş Var)
Bütün Mahmudun Fan+ ı üçün... Əsasəndə Türkiyədə olan dostlarım Emin & Karman & Ağalar-ın xahişi ilə Şəxsi Mahmud Kolleksiyamı Hamıyla Paylaşıram
----------------------------------------------------------------------------------------------------------
AMR FAYLLAR :
Mahmud_Baba_-_Ac_gorum.amr
Mahmud_Baba_-_Barda.amr
Mahmud_Baba_-_Belalim.amr
Mahmud_Baba_-_Camish_Qatigi.amr
Mahmud_Baba_-_Ermeni_Goteshi.amr
Mahmud_Baba_-_Futbol.amr
Mahmud_Baba_-_Gelin.amr
Mahmud_Baba_-_Qayi.amr
Mahmud_Baba_-_Qoyun.amr
Mahmud_Baba_-_Maqintafon.amr
Mahmud_Baba_-_Mal_Qara.amr
Mahmud_Baba_-_Mekteb.amr
Mahmud_Baba_-_Meyxana.amr
Mahmud_Baba_-_MMS_Gonder.amr
Mahmud_Baba_-_Moskva_Zeng.amr
Mahmud_Baba_-_Mushfiqi_Olar.amr
Mahmud_Baba_-_Nene.amr
Mahmud_Baba_-_Perm_Zeng.amr
Mahmud_Baba_-_Radio.amr
Mahmud_Baba_-_Radio_Teze.amr
Mahmud_Baba_-_Rusla.amr
Mahmud_Baba_-_Saptan.amr
Mahmud_Baba_-_Sesin_Gotunden_Cixir.amr
Mahmud_Baba_-_Shaxtababa.amr
Mahmud_Baba_-_Shampan_Butulkasi.amr
Mahmud_Baba_-_Sherq_Bazari.amr
Mahmud_Baba_-_Teleseks.amr
Mahmud_Baba_-_Toyda.amr
Mahmud_Baba_-_ve_Agalar.amr
Mahmud_Baba_-_Yasamal_Usaglari.amr
Mahmud_Baba_-_Yasda.amr
Mahmud_Baba_-_Zorlama.amr
Mahmud_dayi_-_Stalovi.amr
mp3 Fayllar : (bunlar maraqsızdı)
Mahmud_Baba_-_Studio_Mugenniler.mp3
Mahmud_Baba_-_Ye_gelsin-Meyxana.mp3
Mahmud_Baba_-_Baban_Qurban_Rep.mp3
Got Hookah? Dont know how to set up it?? SuperMaH-mud is on the way to help :D
How to Start Smoking
-You ’ve bought your travel hookah(shisa or nargila or kalyan..how u call this). Now what do you do with it? You smoke it, of course :) Here is the Tutorial Guide how to set it up.
Step 1: Learn the parts

Step 2: Unpack your hookah

Step 3: Connect your rubber grommets
-Hmm, for having a good smoking experience u need to make your Hookah air-tight... U need to connect three rubber grommets on your first time. You can keep the grommets on after the first time.


Step 4 : To screw your pipe to the stem
-The author forgot to tag pipe in Hookah parts but if u look carefully u can see it at the left of the picture

Step 5: Add water
- Adding water is a short, but critical step. Because the smoke is passed through the water when smoking, the amount of water greatly effects the amount and quality of your smoke. I’ve found out the best formula is to connect the stem and keep the stem pipe around 1 inch (2-3 cm) under the water, as seen below:


Step 6: Connecting the Hookah
- And now you should connect the hose (into the small rubber we added before) and close the stem into the base (which already has water).


Step 6: Building our Bowl (Head)
- This step is by far the most important and has the greatest impact on your hookah-making skills, so listen up:
Lay out your hookah bowl, tobacco (that you bought before-hand!) and 1-piece of the included aluminium foil (if you didn’t order it, rip a block of your household foil).
- once i used the foil from a bar of Chocolate..u know they cover chocolate with it ... it works and it's fun :)

-Open your tobacco and put a few pieces on your working area. Now use your tongs or fingers to crumble the pieces to smaller parcels. Your goal here is to get them as small as possible, so the air can pass easier. I recommend working on this step a few minutes to master it.


After you do this, transfer the contents into your hookah bowl:

Make sure here not to pack the bowl too tight. Just place it, don’t push or add pressure. We want the air to be able to pass freely through the material.
Also make sure not to overload the bowl, it should be packed to around 90% of the height of the bowl:

Now we need to wrap the bowl up with our aluminium foil. Wrap it up very tight, but without ripping it. It should be air-tight.


Now we need to punch holes in our foil, for the air to pass through. You can either use a toothpick to punch small holes, or the included “Hookah-Puncher”.

For a toothpick, start from the outer layer and work your way in. Punch around 40 evenly spaced holes:

Step 6: Closing the Hookah
- Now let’s connect our bowl to the stem. Plus we can now connect a mouth tip to the hose (optional):


Step 7: Light the Coal
- The final step, light the coal that burns the tobacoo and turns into smoke. Please only use hookah coals and not others (BBQ coals…etc). To light the coal, we’ll need to use our tongs.


After lighting the coal, it should take around 30 seconds for it to completely turn on. While burning, the coal emits a nasty smellin’ smoke. It’s recommended to hold the coal outside until it stops smoking and turns on.
Now, gently place the coal in the middle of the bowl. One side of the coal usually isn’t flat, but has a small rounded indent. That side should be faced down (flat top pointing up)

** It is beter to use regular coal... But in home conditions its little bit difficult to heat coal from tree.. If u see coal from Lemon tree- its the best one..
Step 8: Start Smoking
---------------------------------------------------------------------------------------------------------
** Lets imagine that u dont have bowl but u want to make Shisa,Hookah !! What u gonna do...
There is alternative way...
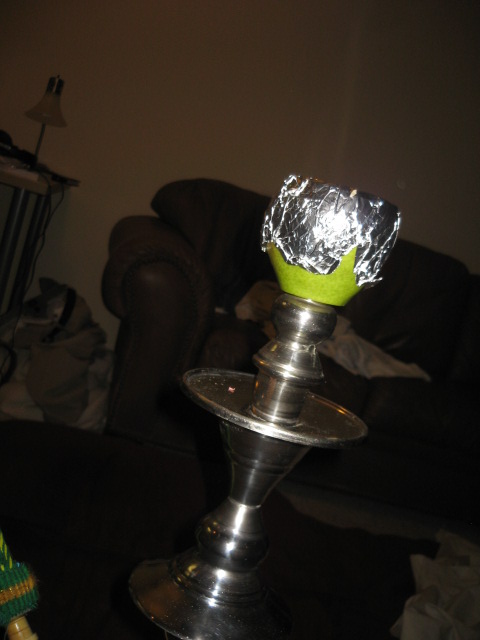
Instead of ceramic bowl u can use fruits which we eat.. For example with apple or with pear or with kiwi, whatever you want... First u need to cut a little piece from up side of fruit.. Then scoop out inside of fruit.. Then make a little hole in the bottom of that Fruit ...Put molasses(flour which u will smoke) inside that fruit.. cover it with foil... then connect your fruit bowl with stem.. thats it :D


**
Then if u dont have base.. this pot which u fill with water... instead of base u can use "Watermelon" or "Ananas" or "Melon" ...for this u need to make a little hole on the up side of watermelon... smash the staff inside + u can pour some Juise or just water to watermelon... then just stick your ready hookah to watermelon... it will be nice indeed


***
Isntead of water u can use Wine, Vodka, any fruit juise u wish, Milk... it is also option... to tell the trust i didnt tryed any of these
List Of Reference :
http://www.puffyhookah.com/2009/3/travel-hookah-guide/
-You ’ve bought your travel hookah(shisa or nargila or kalyan..how u call this). Now what do you do with it? You smoke it, of course :) Here is the Tutorial Guide how to set it up.
Step 1: Learn the parts

Step 2: Unpack your hookah

Step 3: Connect your rubber grommets
-Hmm, for having a good smoking experience u need to make your Hookah air-tight... U need to connect three rubber grommets on your first time. You can keep the grommets on after the first time.


Step 4 : To screw your pipe to the stem
-The author forgot to tag pipe in Hookah parts but if u look carefully u can see it at the left of the picture

Step 5: Add water
- Adding water is a short, but critical step. Because the smoke is passed through the water when smoking, the amount of water greatly effects the amount and quality of your smoke. I’ve found out the best formula is to connect the stem and keep the stem pipe around 1 inch (2-3 cm) under the water, as seen below:


Step 6: Connecting the Hookah
- And now you should connect the hose (into the small rubber we added before) and close the stem into the base (which already has water).


Step 6: Building our Bowl (Head)
- This step is by far the most important and has the greatest impact on your hookah-making skills, so listen up:
Lay out your hookah bowl, tobacco (that you bought before-hand!) and 1-piece of the included aluminium foil (if you didn’t order it, rip a block of your household foil).
- once i used the foil from a bar of Chocolate..u know they cover chocolate with it ... it works and it's fun :)

-Open your tobacco and put a few pieces on your working area. Now use your tongs or fingers to crumble the pieces to smaller parcels. Your goal here is to get them as small as possible, so the air can pass easier. I recommend working on this step a few minutes to master it.


After you do this, transfer the contents into your hookah bowl:

Make sure here not to pack the bowl too tight. Just place it, don’t push or add pressure. We want the air to be able to pass freely through the material.
Also make sure not to overload the bowl, it should be packed to around 90% of the height of the bowl:

Now we need to wrap the bowl up with our aluminium foil. Wrap it up very tight, but without ripping it. It should be air-tight.


Now we need to punch holes in our foil, for the air to pass through. You can either use a toothpick to punch small holes, or the included “Hookah-Puncher”.

For a toothpick, start from the outer layer and work your way in. Punch around 40 evenly spaced holes:

Step 6: Closing the Hookah
- Now let’s connect our bowl to the stem. Plus we can now connect a mouth tip to the hose (optional):


Step 7: Light the Coal
- The final step, light the coal that burns the tobacoo and turns into smoke. Please only use hookah coals and not others (BBQ coals…etc). To light the coal, we’ll need to use our tongs.


After lighting the coal, it should take around 30 seconds for it to completely turn on. While burning, the coal emits a nasty smellin’ smoke. It’s recommended to hold the coal outside until it stops smoking and turns on.
Now, gently place the coal in the middle of the bowl. One side of the coal usually isn’t flat, but has a small rounded indent. That side should be faced down (flat top pointing up)

** It is beter to use regular coal... But in home conditions its little bit difficult to heat coal from tree.. If u see coal from Lemon tree- its the best one..
Step 8: Start Smoking
- Now the fun part! Just start smoking. It takes 3-4 minutes of smoking for the hookah to start up, so don’t worry if it doesn’t happen right away.
---------------------------------------------------------------------------------------------------------
** Lets imagine that u dont have bowl but u want to make Shisa,Hookah !! What u gonna do...
There is alternative way...
Instead of ceramic bowl u can use fruits which we eat.. For example with apple or with pear or with kiwi, whatever you want... First u need to cut a little piece from up side of fruit.. Then scoop out inside of fruit.. Then make a little hole in the bottom of that Fruit ...Put molasses(flour which u will smoke) inside that fruit.. cover it with foil... then connect your fruit bowl with stem.. thats it :D


**
Then if u dont have base.. this pot which u fill with water... instead of base u can use "Watermelon" or "Ananas" or "Melon" ...for this u need to make a little hole on the up side of watermelon... smash the staff inside + u can pour some Juise or just water to watermelon... then just stick your ready hookah to watermelon... it will be nice indeed


***
Isntead of water u can use Wine, Vodka, any fruit juise u wish, Milk... it is also option... to tell the trust i didnt tryed any of these
List Of Reference :
http://www.puffyhookah.com/2009/3/travel-hookah-guide/
Subscribe to:
Posts (Atom)